
Golfstead is reader-supported. When you buy through links on the site, we may earn an affiliate commission at no extra cost to you. Our affiliations include, but are not limited to, the eBay Partner Network and Amazon Associates.
We’re sure you don’t need to be told how important good putting is to lowering your scores in golf.
And if you’re serious about improving your putting, being able to practice without getting out to the range, out to the course, or even just outside in general is a huge asset.
This is where putting greens come in. While golf simulators allow you to analyze your shot data and hit your irons and woods indoors, indoor putting greens allow you to practice your putting (and often chipping as well) rain or shine, day or night.
Of course, not everyone can afford top-of-the-line putting green complexes that cost four or even five figures. Fortunately, you can save a tremendous amount of money building one yourself with relatively cheap materials obtainable at your local hardware store.
So today, we’ll walk through a step-by-step DIY guide for building your own indoor putting green. This is certainly not the only way to build a putting green, but we believe it’s one of the easiest and best methods that anyone with a bit of handyman skills can apply.
We will also tell you how you can gain access to a support system that will be available to help you at any point in the building process. To jump to that right now, click here.
What You’ll Need
Depending on the exact method you use to build your indoor putting green and whether or not you run into any problems, you may not need all of the items below:
- lumber pieces for outer frame (2″x4″, 2″x6″ or 2″x8″)
- lumber pieces for inner supports (quantity depends on size of green)
- nails and screws
- power drill
- hammer
- framing square
- circular saw
- plywood sheets (or particle board)
- underlayment or carpet padding
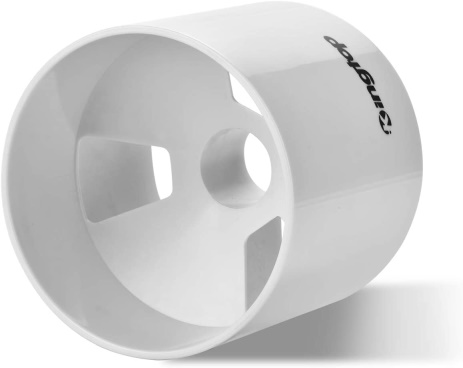
- 4.25″ hole saw blade
- 4.25″ regulation cups
- putting green turf (Camry Golf recommended)
- 1/16″ trowel
- carpet adhesive (Roberts 6700 recommended)
- Goo Gone adhesive remover
- carpet knife
- utility knife
- 3/4″ PVC pipe with fittings
- hacksaw
Where To Buy
In our opinion, Camry Golf is the best place to buy putting green turf — this fantastic turf has actually been endorsed by pro golfer Webb Simpson. They also sell regulation cups.
The rest of the materials can be purchased at your local hardware store, online or at brick-and-mortar retail locations. You can get really good power drills at great prices on Amazon.
Cost
When it comes to the cost of building an indoor putting green, it’s just about impossible to give an exact dollar amount, especially in the current economy where the price of building supplies is so unstable.
There are so many variable at play, including the size of the green, the materials you already have, the materials you plan to use, and the prices in your local area.
However, if your putting green is to have an area of 60-70 square feet, you can expect the cost (from scratch) to be around $320. This is significantly cheaper that any pre-built branded putting green out there.
Step 1: Choose a size and location.
Before you even start constructing your indoor putting green, you need to decide how big it’s going to be. The bigger, the better, obviously, but size is going to be dictated by:
- the maximum length of putt you want to be able to practice
- whether your space can accommodate a given size of putting green
You should strive to make room for 10-foot putts at a minimum. Anything at or inside this distance is a putt that you intend to make and should be your most important goal.
Putts outside of 10 feet are nice to have, but they’re more like lag putts where you’re just trying to get it close to the hole.
You should also consider the fact that most plywood or particle board sheets come in 4 ft x 8 ft sizes, so if the total area of your putting green is some multiple of that (e.g. 4’x16′, 8’x8′), it will make the building process much easier.
Of course, whether you plan to put your putting green in a basement, living room, or some other indoor space, it will need to be large enough to contain it. And you should keep a cushion of at least a few feet around all sides of the putting green; don’t put it up against a wall because that can interfere with your stroke.
Step 2: Construct the frame.

A self-contained indoor putting green generally requires not just an outer frame, but also an inner frame that supports the boards and turf placed on top as well as your body weight when standing on the putting green.
Outer Frame
For the outer frame, you have a choice of using 2″x4″, 2″x6″ or 2″x8″ wood boards.
Each of these sizes have been used successfully to build great putting greens, but we suggest 2″x6″ or 2″x8″ sizes because they are more resistant to bowing under weight and you won’t have issues with the cups being too tall to fit.
Depending on whether you want to build a square or a rectangular-shaped putting green, you may want two sides of the frame to be longer. Hardware stores like Home Depot will likely offer different lengths for this purpose — for example, you could use two 8-footers and two 12-footers.
Once you have everything ready, do the following:
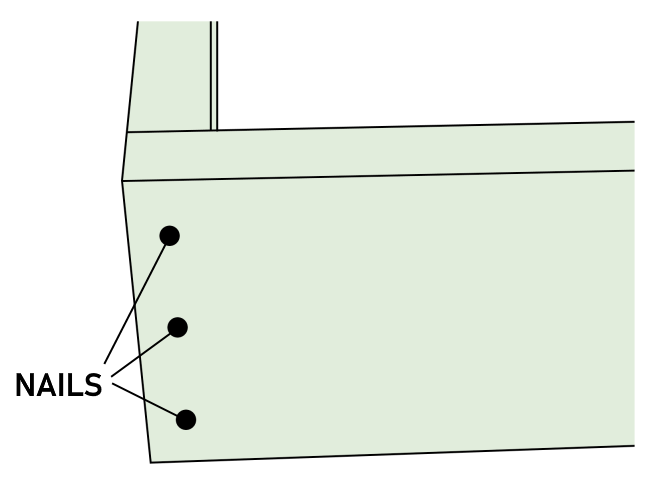
- Lay out the putting green frame in a butt joint style, ideally with the nice side of the boards facing outward.
- For each corner, use your power drill to drill 2-3 pilot holes through the face of the outside board into the end of the adjoining board. At least three holes are advisable for 2″x8″ boards.
- Insert the correct-sized nails into the holes.
- Use your framing square to square up the frame.
- Hammer the nails in fully to secure the frame.
Pre-drilling the holes isn’t necessary but it does make things easier, especially if you’re not particularly experienced in these kinds of DIY projects.
Inner Frame
The first thing you need to consider when securing the inner support pieces is the fact if you were to lay a board inside the framed region (widthwise in the case of a rectangular green), it would be about three inches too long due to the thickness of the two frame pieces which are both 1.5 inches.
For this reason, you’ll need to trim three inches off the length of the inner frame boards using your circular saw. A few things to note:
- it’s easier to trim 3 inches off one side instead of 1.5 inches off both.
- we recommend spacing the inner boards roughly two feet apart, so whatever number of boards achieves that layout is the number of boards you’ll need to trim.
- if there are knots or splits on one end, trim that side off.
Once all the boards are trimmed to the correct length, place a few of them loosely within the frame and cover everything with your plywood sheets. Try not to leave any gaps in between adjacent sheets. Mark the excess regions around the perimeter with a pencil and trim them off.
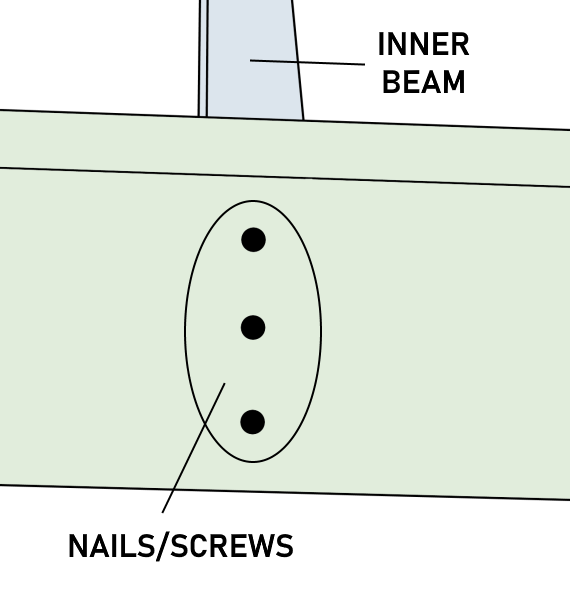
If you’re using more than one plywood sheet, note the crease where both of the boards meet inside the frame — one of the inner supports should rest directly underneath. Mark this position, remove the boards, and nail the first beam in place.
From here, position the rest of the inner supports around 1.5-2 feet apart, and secure them to the frame with nails or screws.
Step 3: Secure the plywood base.
You can use cheaper particle board for the base of the putting green, but if you can afford it, we recommend plywood sheets because they are sturdier and much less likely to split or sag under pressure. The only drawback of plywood aside from price is that drilling the cup holes can be more difficult.
Now, lay your plywood sheets over the top of your frame, ensuring that the edges are flush with the edges of the frame. Any excess plywood that would overshoot the side of your build should have been trimmed off in the previous step.
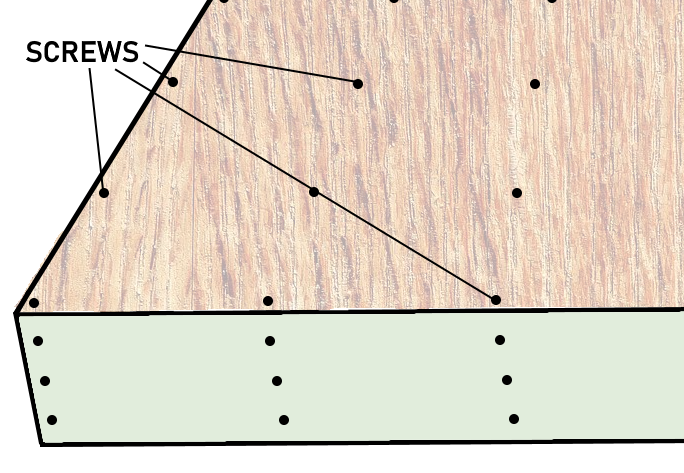
Start by screwing down the four corners of the sheet (or eight corners if using two sheets) with your power drill equipped with a screwdriver bit. Do it about ¾” from the edge of the frame — this is the halfway point of the 1.5″ board.
You should now be able to walk on the top of the sheet, but at this point, you might as well go ahead and drill more screws into the plywood sheet along the perimeter and along the inner cross-beams as well. You should have one screw every 1-1.25 feet or so.
Remember that if you followed the previous step correctly, any sheet edges that fall inside the frame should be supported directly underneath by a cross beam. If not, you’ll need to backtrack and add one.
Step 4: Mark and drill the cup holes.
Many people find drilling the cup holes to be a pain in the rear, particularly with plywood which is more difficult to cut through than particle board. But with some patience, finesse and preparation, it’s not too bad.
Marking The Holes
There are a few important things to consider when choosing the locations of your holes:
- regulation golf cups have a diameter of 4.25″, or a radius of 2-1/8″.
- you’ll probably want 2-5 holes depending on the size of your build.
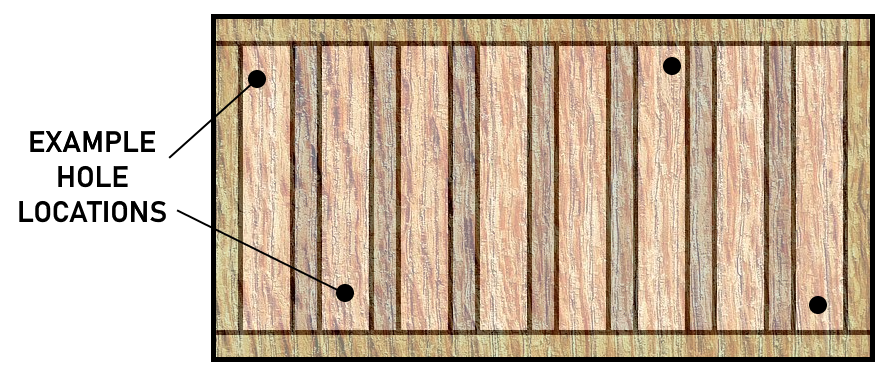
- the holes should be near the edges as this gives you the most room to practice the longest putts.
- the hole should not touch any of the frame beams.
We suggest choosing locations for your holes that are at least three inches from any beams that make up the frame. Mark the center points with a pencil.
Also take into account your handedness (left or right) when choosing the hole locations.
Drilling The Holes
Before you go ahead and drill with the hole saw blade in place, we recommending drilling a small hole in the center point of the hole first. Combined with the pilot bit, this will ensure that the blade stays in place during drilling and creates a properly sized circular hole.
Take your drill equipped with the 4-1/4″ hole saw blade and a pilot bit, use the center hole as a reference point, and start drilling. If you’re having trouble making the cut, try putting the drill in reverse.
It may take a few minutes to cut through the plywood, so take your time.
A Note On Installing The Cups
Many people drill 4-1/8″ holes, sand off the excess, and force the cups in super tight before applying the turf over top. You’ll find this method in many guides online.
However, in our view, it’s unnecessary and not worth the effort. Not only does it require using a tool like a sanding drum, but it also means you’ll need to cut holes out of the turf by hand, and the end result can be messy.
Optional: Adding An Underlayment
You can lay the putting green turf directly over the base, but it will result in a surface that feels hard and is quite noisy.
This is why we suggest adding underlayment or carpet padding on top of the base. This will not only make for a softer feel on the feet and reduce noise, but it will also help retain heat.
To start, first loosely cover the entire area of the particle board with the carpet padding. You will likely have to arrange multiple adjacent pieces depending on the size you purchased; if this is the case, make sure the seams are as flush as possible.
Similar to what you did when laying the plywood sheets, mark the excess padding around the perimeter with a pen or Sharpie and cut it off with a utility knife. Also use a pin to figure out where the holes are in the base and cut holes out of the padding.
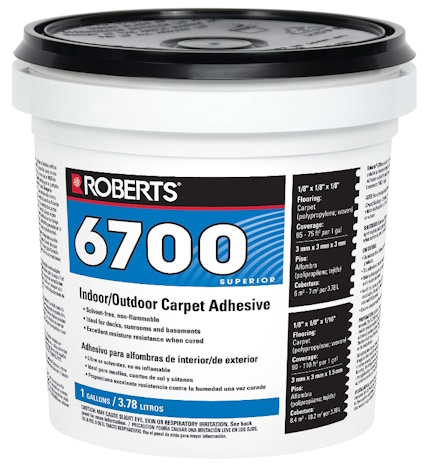
Then you can glue the carpet padding down piece-by-piece. The best thing we would recommend for this is the multipurpose adhesive Roberts 6700 — it’s super reliable and always delivers a smooth, even adhesion every time.
Step 5: Glue down the turf.
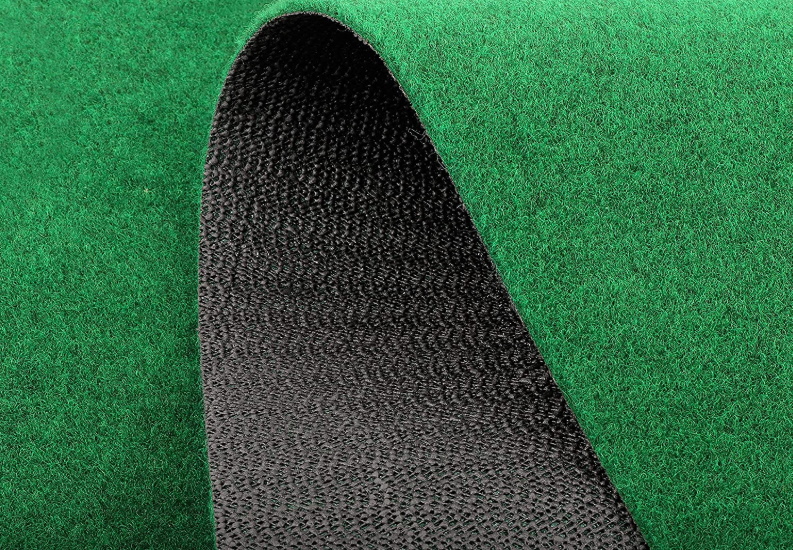
We can’t recommend enough that you use Camry Golf turf for your putting green. This high-quality material emulates Tour-level greens with an amazing roll, it’s endorsed and used by pro golfers including Webb Simpson, and you can get any size you need for your particular build. Get it here.
Once you have your turf in hand, we suggest laying it out on the platform, putting weights on top like books, and leaving it for a couple days to flatten out any bumps, kinks or curls.
Then, start applying carpet adhesive to the plywood or carpet padding surface with your trowel. We suggest rolling the turf over 3-5 foot sections at a time. Start by lifting one side, switch to the other side, and then gradually move towards the opposite end.
Make sure to follow the application instructions of whichever adhesive you’re using, which will likely include:
- giving the adhesive a number of minutes to set
- keeping foot traffic on top of the glued turf to a minimum for 1-2 days while the adhesive cures
You don’t need to apply much pressure to the glued turf aside from a few books while it dries. If there’s any extra turf hanging over the sides, cut it off with a carpet knife.
Gluing Camry Golf Turf
The above guidance is general guidance for gluing down any kind of putting green turf. But with Camry Golf turf in particular, the process is quite a bit simpler.
Camry turf comes pre-aligned and is ready to be rolled onto a glued surface. So once you’ve spread out the carpet adhesive with your trowel, all you need to do is unroll the turf onto the surface and gently smooth out the application with a light book. There’s no need to press down.
Then, give it 24 hours to dry, and don’t step on the putting green during this time.
If you accidentally get some adhesive on the turf, wait until the drying is complete and simply use some Goo Gone adhesive remover to clean it right off.
Step 6: Install the cups.
You should have made a rough mental note of where the hole locations are on your putting green.
Get a pin or something similar and push it through the turf in that general area until you’ve identified both sides of the circular hole (if you don’t hit board, the hole is there).
Once the hole is marked, take your carpet knife and cut an X in the turf, ensuring that its size is no larger than the hole underneath. You can then take a regulation cup and push it through until it’s flush with the green surface. Repeat the process for all of the holes.
Step 7: Add a backstop.
You could technically start using your putting green as is, but it wouldn’t be ideal because your balls would be falling over the side.
So, you should install some kind of backstop around the perimeter of the putting green; this might be a border of wood planks, a fence, or a bumper rail.
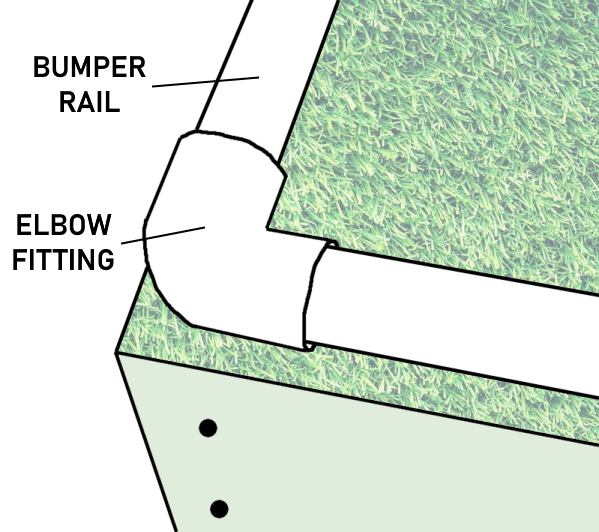
One of the easiest routes to take here is to build a bumper rail out of 3/4″ PVC pipes. It’s not a particularly glamorous solution, but it’s very effective, and you can use leftover piping as alignment aids too.
You will need at least four elbow fittings, and depending on the size of your build and the lengths of PVC pipe that are available to you at stores, you may need to use some couplings as well.
Start by laying down one side of the PVC pipe on the putting green. If it’s too short, join it to another pipe with a coupler. Mark the excess that runs off the other side and cut it off with a hacksaw.
Then put the cut side into an elbow fitting, insert another pipe, and do the same for the adjacent side. Repeat the process for all sides until you have a bumper rail that properly fits your build.
Balls shouldn’t move the bumper rail much, so you could leave it on the putting green loosely, but it’s a good idea to secure it in place. You can do this by nailing the elbow fittings and center points of each side to the frame.
Additional Considerations

The great thing about a basic, flat indoor putting green is that it allows you to practice the most important aspect of putting, which is impacting the ball with a square face. Many people believe that slopes and breaks should be reserved for the golf course, and we tend to agree.
However, if you want to practice break on your green, there are a few things you could do to introduce uphill, downhill or sidehill putts:
- use furniture levelers
- stack thick books or bricks under a corner or side
- use a jack
Other things to note:
- you can decorate the outer frame of your putting green with stain, varnish, paint, trim, or artwork based on your own personal tastes
- you should build your putting green where you want to use it, since moving it can be awkward, particularly though narrow spaces
To make the finished product look nicer, we recommend using wood filler to fill in any knots, splits, cracks, or screw holes on the visible part of the frame. You should also sand down any exposed sharp edges.
Conclusion
We have tried to include a fair bit of detail in our step-by-step guide on how to build an indoor putting green, but we’ve left out a lot of the minutiae. It will be up to you to use your common sense and DIY experience to successfully execute your vision.
We’ve mentioned Camry Golf greens before. It really is a no-brainer to buy your putting green turf from them because:
- it emulates top-tier greens
- it lasts long and has a premium look
- it rolls true in every direction (11 on the Stimpmeter)
- it’s very affordable
- it’s endorsed by pro golfers
Another huge perk of buying your turf from Camry Golf is that you gain access to their support team which will help you at any point during the construction process, as opposed to being on your own to figure everything out. They’re just an email or a phone call away.
Best of luck building your dream indoor putting green!
Thanks for reading this guide. How did your indoor putting green project turn out? Feel free to leave a comment below. If you’re interested in the best pre-built branded putting greens, go here. If you’d like to build an outdoor backyard putting green, check this out.


This was so rad to make! My wife had to call in our carpet cleaners cause I have been using the same strip of carpet for the last few years for putting and it has become disgusting. Can’t wait to use it this weekend while I watch the Masters!
Glad it turned out!
Hello there. Since I live in a colder climate, having an indoor putting green would be a game-changer for me, and your guide has inspired me to get started. But what materials do you recommend for creating the base of the putting green? Are there any particular materials that work better than others to provide a smooth surface for putting? Also, what type of lighting do you recommend for an indoor putting green?
Hi there. For the base, particle board or plywood are ideal, but as I mention in the guide, plywood is the best because it’s sturdier and much less likely to split or sag under pressure. As for lighting, are you talking about overhead (ceiling) lighting or lights actually integrated into the putting green itself? If it’s the former, any sufficiently bright lighting will do, but I suggest LED if possible; you don’t really want a low light situation because it can affect your alignment, stroke, and green-reading ability. If it’s the latter, I can’t advise anything until I know more about what you have in mind. Good luck!
Loved creating my project 4×15 garage putting green. something about having 4″ cups just makes gives 100x satisfaction. the camry DIY was super easy and informative. They send a free DIY plan with photos of recent customer priencts similar to the size you go with. this was very very helpful and saved me hours of research for a solution. Made me get handy and spend quality time with my son!
Awesome Dave!
Very informative article, thank you
A couple of questions:
1. 1/2″ or 5/8″ plywood or OSB.?
2. You don’t feel any bounce with the 24″ on-center floor joists/supports? Typically 16″
centers are used for flooring. I plan on a 8’x12′ green.
3. I like the idea of padding for the reasons you listed, but a Camry rep, that I spoke with, suggested it’s not necessary. What thickness and type pad do you suggest?
4. You suggest something like books to lay on top of the turf. What locations would you place them? It seems that where the books are placed it would cause dips in the turf.
The above comments are by no means criticism.
Thank You!
Hi Jeff,
1) 5/8″ plywood would be better, but 3/4″ would be best. 1/2″ should be the minimum for that size of green. I don’t have experience with using OSB in greens but I would stick with plywood if possible.
2) You could definitely do 16″-18″ spacing if you want for extra stability. That shouldn’t be a problem.
3) Any decent 3/8″ or 7/16″ carpet padding should work well. You don’t need to put padding underneath, but if I were building a putting green from scratch that I planned to use for years, I would do it personally. As I mentioned, it does make the feel softer and reduces noise.
4) You probably don’t need to put books on top, but if you do, they shouldn’t be too heavy. If you’re using Camry Golf turf, you just need to unroll the turf onto the surface and smooth out the application once with something like a light book. This would probably work for other kinds of turf as well. If you’re flattening it out beforehand, you might just need to put weighted objects on the very corners or edges and let it settle on its own.
Thanks for the comment, and hope this helps.